
Creating recipes
This page covers every field in the recipe editor, and how to save, duplicate and delete a recipe.
The editor is available on every plan. Step photos, Add to Cart buttons, FAQs, share images and QR codes need the Growth plan. Compare plans on the Recipe Kit app listing.
Starting a recipe
Open Recipe Kit and click New recipe at the top of the home page. The New recipe page asks How would you like to start? and gives you three ways in:
| Option | What it does | Plans |
|---|---|---|
| Draft it with AI | Writes a complete recipe in under a minute. You can change anything before you create it | Growth and Enterprise. Free and Essentials get three free drafts every 30 days, and the card shows how many are left |
| Write it yourself | Opens the recipe editor with a blank recipe | All |
| Import a recipe | Reads a recipe from a link, a photo, a PDF or pasted text. Pick the From URL, From photo or Paste text tab, click Import recipe, check the result and click Continue to editor | All, including Free. If your plan limits imports, the card says how many you have |
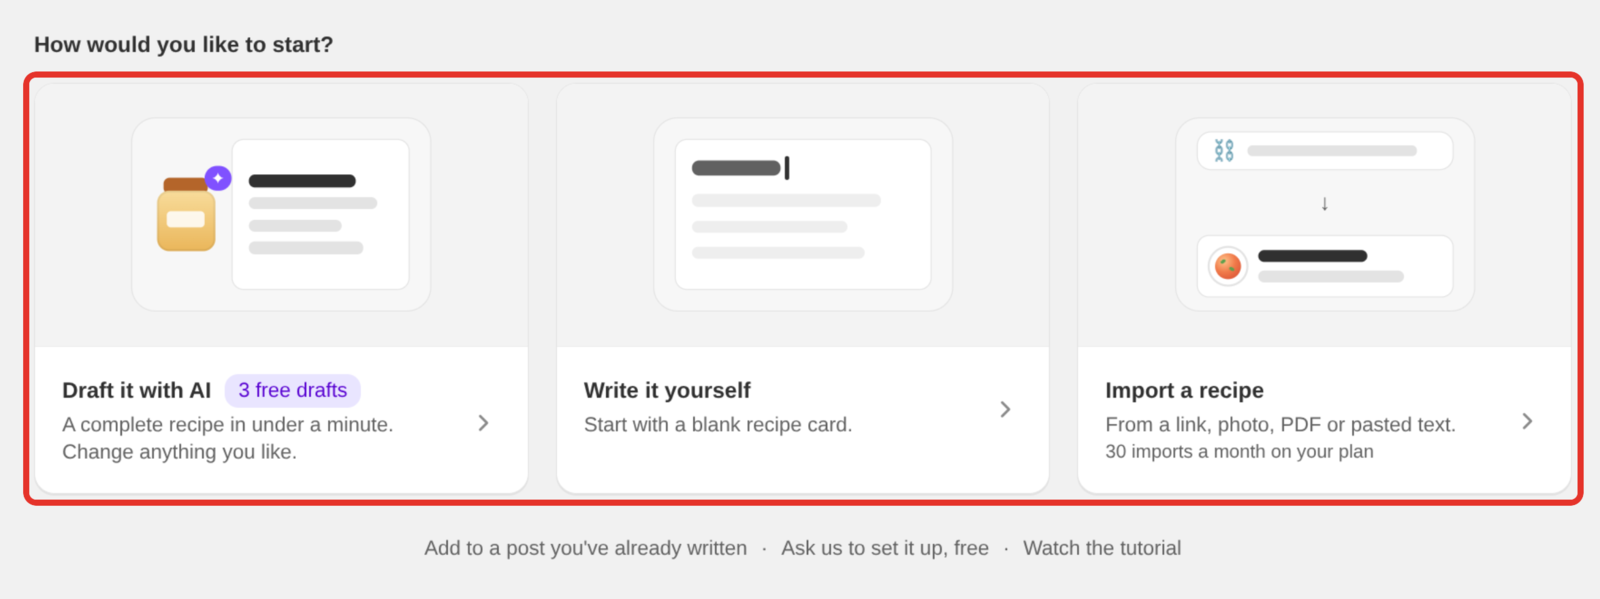
All three open the recipe editor, and all three give the recipe its own blog post when you click Create.
If Recipe Kit finds recipes on your blog that are not in Recipe Kit yet, a card above the options says how many and offers Import them.
To put the recipe on a blog post you have already written, click Add to a post you've already written below the options. See Use a post you already wrote below.
The Free plan holds 5 recipes. Once you reach that, the button on the home page reads Upgrade to add more instead of New recipe, and the New recipe page shows Choose a plan to continue above greyed-out options.
If you are moving a library across rather than adding one recipe, use Tools > CSV import or Tools > Import from your store instead. See Bulk recipe import and export.
Create the recipe and its blog post
A new recipe gets its own blog post. You do not need to write the post first.
A new recipe opens with two tabs at the top of the editor, Recipe and Blog post. The Blog post card on the right has Create a new blog post selected.
- On the Recipe tab, fill in the recipe.
- Under Set visibility, check the status. A new recipe starts with your Default Recipe Status (Settings > Advanced), which is Published unless you changed it. Choose Hidden if the recipe is not ready to go live.
- If you want the post to have its own title, intro or image, open the Blog post tab. See Write the blog post below. You can skip this.
- Click Create in the top right.
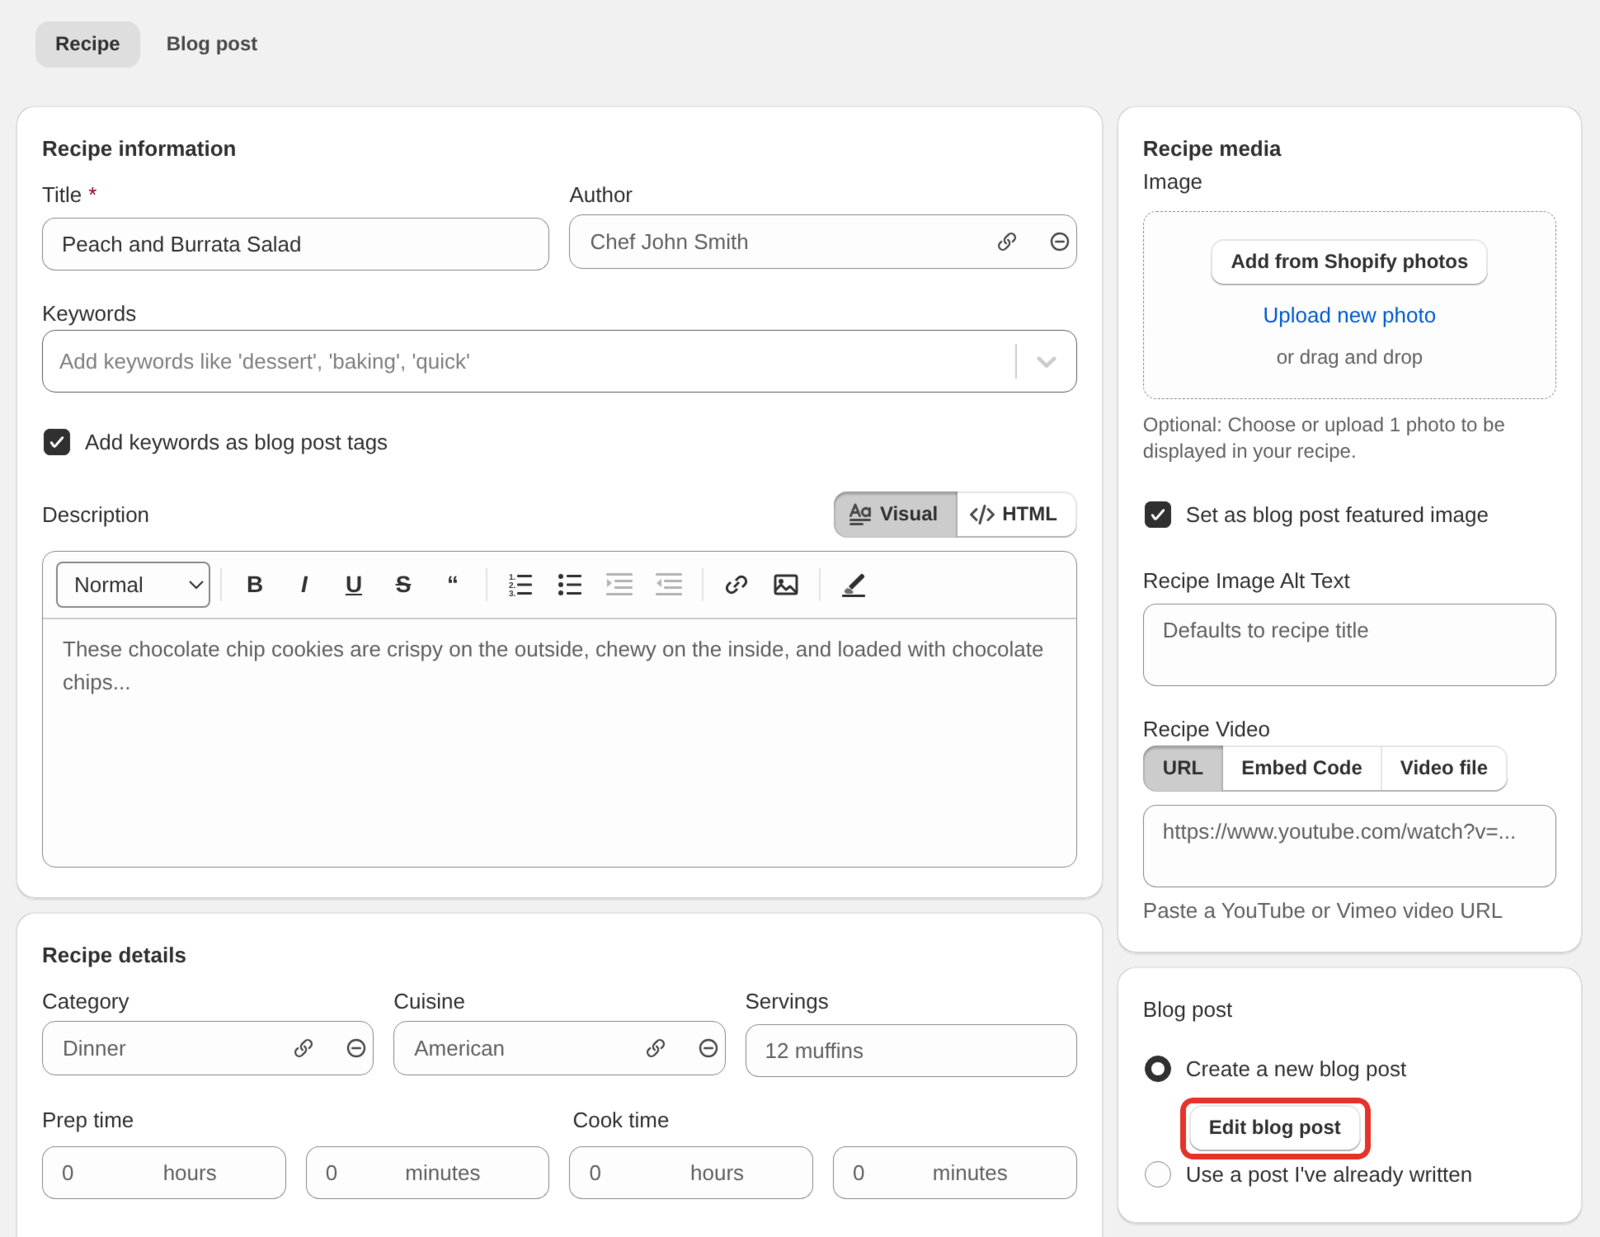
Recipe Kit saves the recipe and makes its blog post. The post goes in the blog you picked on the Blog post tab. If you did not pick one, it goes in your Default Recipe Blog from Settings > Advanced, then a blog with "recipe" in its name, then your first blog. If your store has no blog, the recipe is saved without a post.
A Published recipe publishes its post. A Hidden recipe's post stays hidden until you publish the recipe. If Default Recipe Status is set to Disabled, a new recipe starts as Published but Recipe Kit never publishes or hides its post, so a new post stays hidden until you publish it in Shopify. If Create fails, for example because another recipe already has the same title, nothing appears on your store. Fix the problem and click Create again.
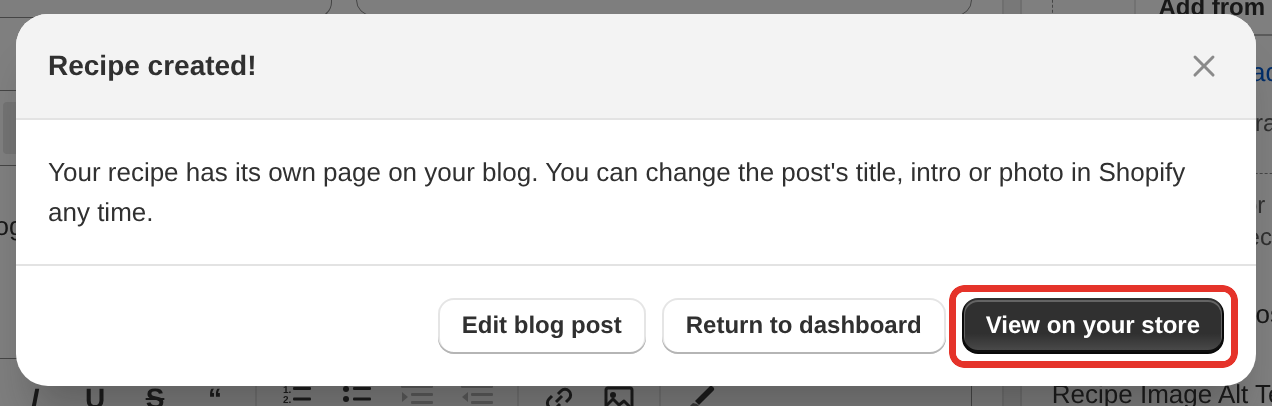
When it is done, the Recipe created! window opens with View on your store, Edit blog post and Return to dashboard. When there is nothing to view yet, because the recipe or its post is hidden, the window has Return to dashboard and Edit blog post only, and says the post is hidden. Edit blog post opens the post in Shopify, where you can change it any time.
Write the blog post
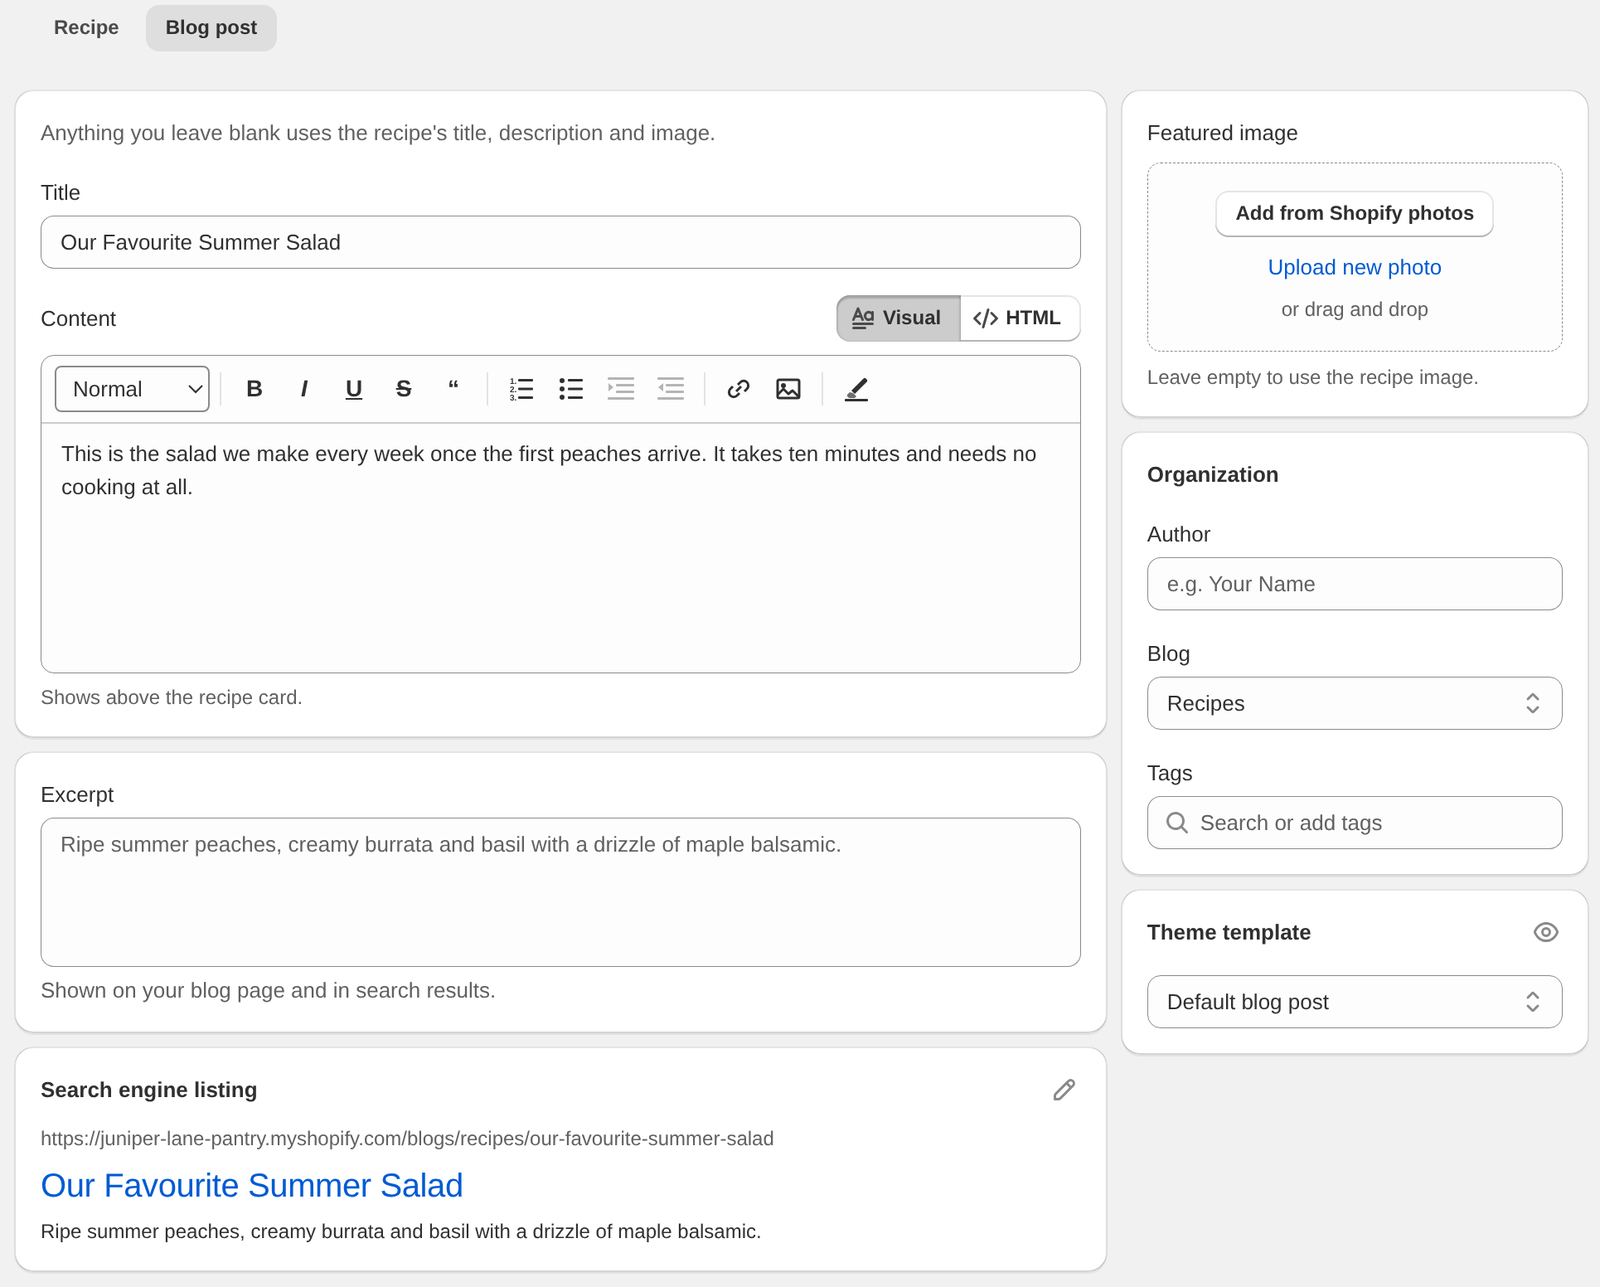
On a new recipe, the Blog post tab holds the post the recipe goes in. Everything on it is optional. Anything you leave blank uses the recipe's title, description and image, so a post you never open matches the recipe.
- Click the Blog post tab, or Edit blog post in the Blog post card.
- Fill in the fields you want.
- Click Create. The recipe and the post are saved together.
| Field | What it does |
|---|---|
| Title | The post title. It also sets the post's URL. Blank uses the recipe title |
| Content | The text of the post, shown above the recipe card. Switch between Visual and HTML. Blank gives a post with only the recipe card |
| Excerpt | Shown on your blog page and in search results. Blank uses the recipe description |
| Search engine listing | A preview of the post in search results. Click the pencil icon to set the Page title and Meta description. The URL handle follows the title |
| Featured image | Blank uses the recipe image. If you pick an image here, Set as blog post featured image on the Recipe tab turns off, so the recipe image never replaces it |
| Author | The post's author. Blank uses the recipe's Author, or your store name if the recipe has none |
| Blog | Which blog the post goes in. Shows only when your store has more than one blog |
| Tags | Shopify tags for the post. Pick one you have used before, or type a new one and press Enter |
| Theme template | The theme template the post uses. It starts on your Default Blog Post Template from Settings > Advanced. The eye icon opens the template in the theme editor |
Once you change a field, the Blog post card shows an Edited badge next to Edit blog post.
After the recipe is created, the post is an ordinary Shopify post. Change it in Shopify from now on.
Use a post you already wrote
There are two ways to put a new recipe on a post you have already written.
From the New recipe page. Click Add to a post you've already written below the options. The editor opens with a Connect to a blog post card instead of the tabs. Click Select blog post, pick the post, fill in the recipe and click Create.
After you have started. If you chose Write it yourself, Import a recipe or Draft it with AI, choose Use a post I've already written in the Blog post card. Pick the post in the window that opens. Change blog post picks a different one, and Create a new blog post goes back to a new post. The window also has Create new: enter a title, pick a blog and click Use new post. Recipe Kit makes that post when you click Create.
With a post picked, the Blog post tab shows a preview of the post as it is in Shopify: its title, excerpt and image, a Hidden badge if it is not published, and its search engine listing. Recipe Kit does not change the title or text of a post you already wrote. Click Edit post in Shopify to change it there, or Create a new blog post instead.
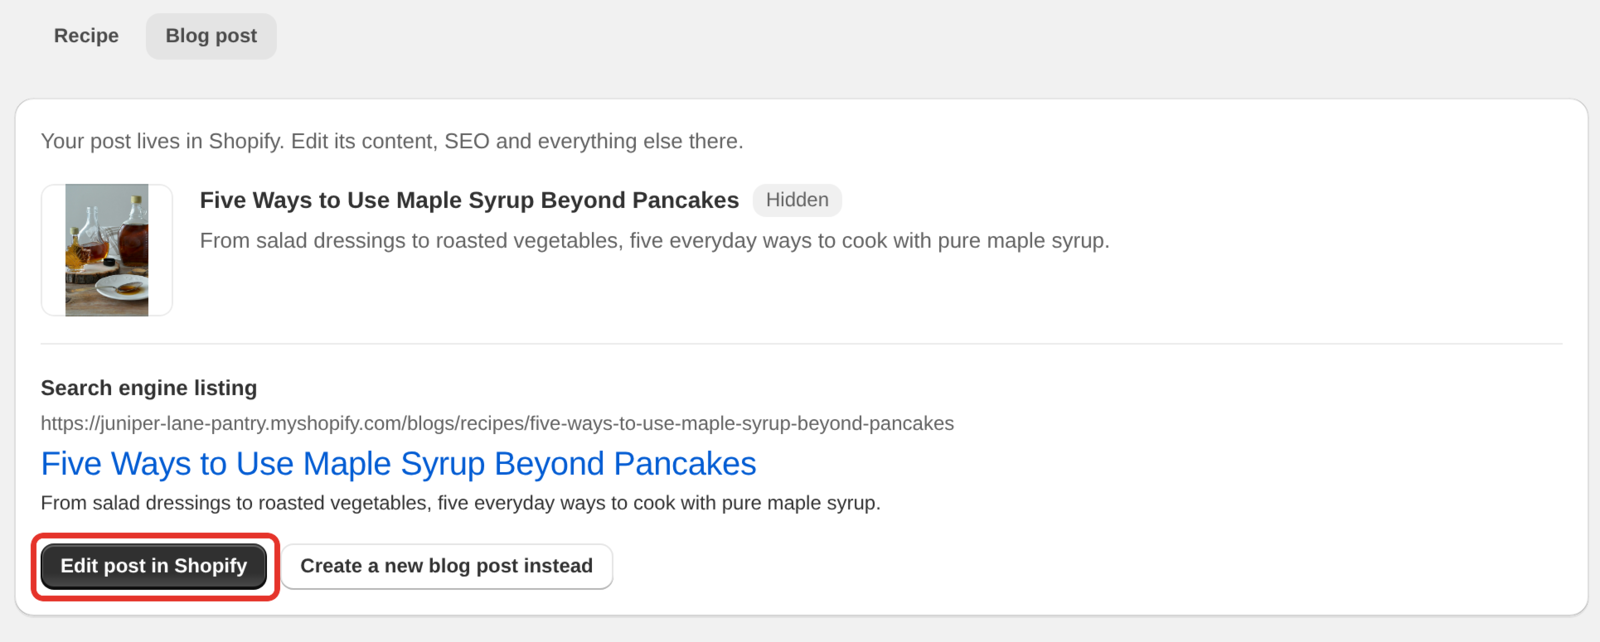
When you click Create, a Published recipe also publishes the post if it was hidden. A post scheduled for a later date keeps its date.
Save as you go
Recipe Kit does not autosave. On a new recipe nothing is saved, and no blog post is made, until you click Create. That includes anything on the Blog post tab. After that the button reads Save. Click it before you navigate away or close the tab, especially on a long recipe.
If you try to leave the page with unsaved edits, Recipe Kit asks first in an Unsaved changes window. Click Stay to go back and save, or Leave page to throw the edits away.
The fields
The editor has two columns. The left column holds the recipe itself, in this order: Recipe information, Recipe details, Ingredients, Equipment, Directions, Nutrition, Notes and Frequently asked questions. The right column holds Recipe media, Connect to a blog post (called Blog post on a new recipe), Set visibility and Ratings.
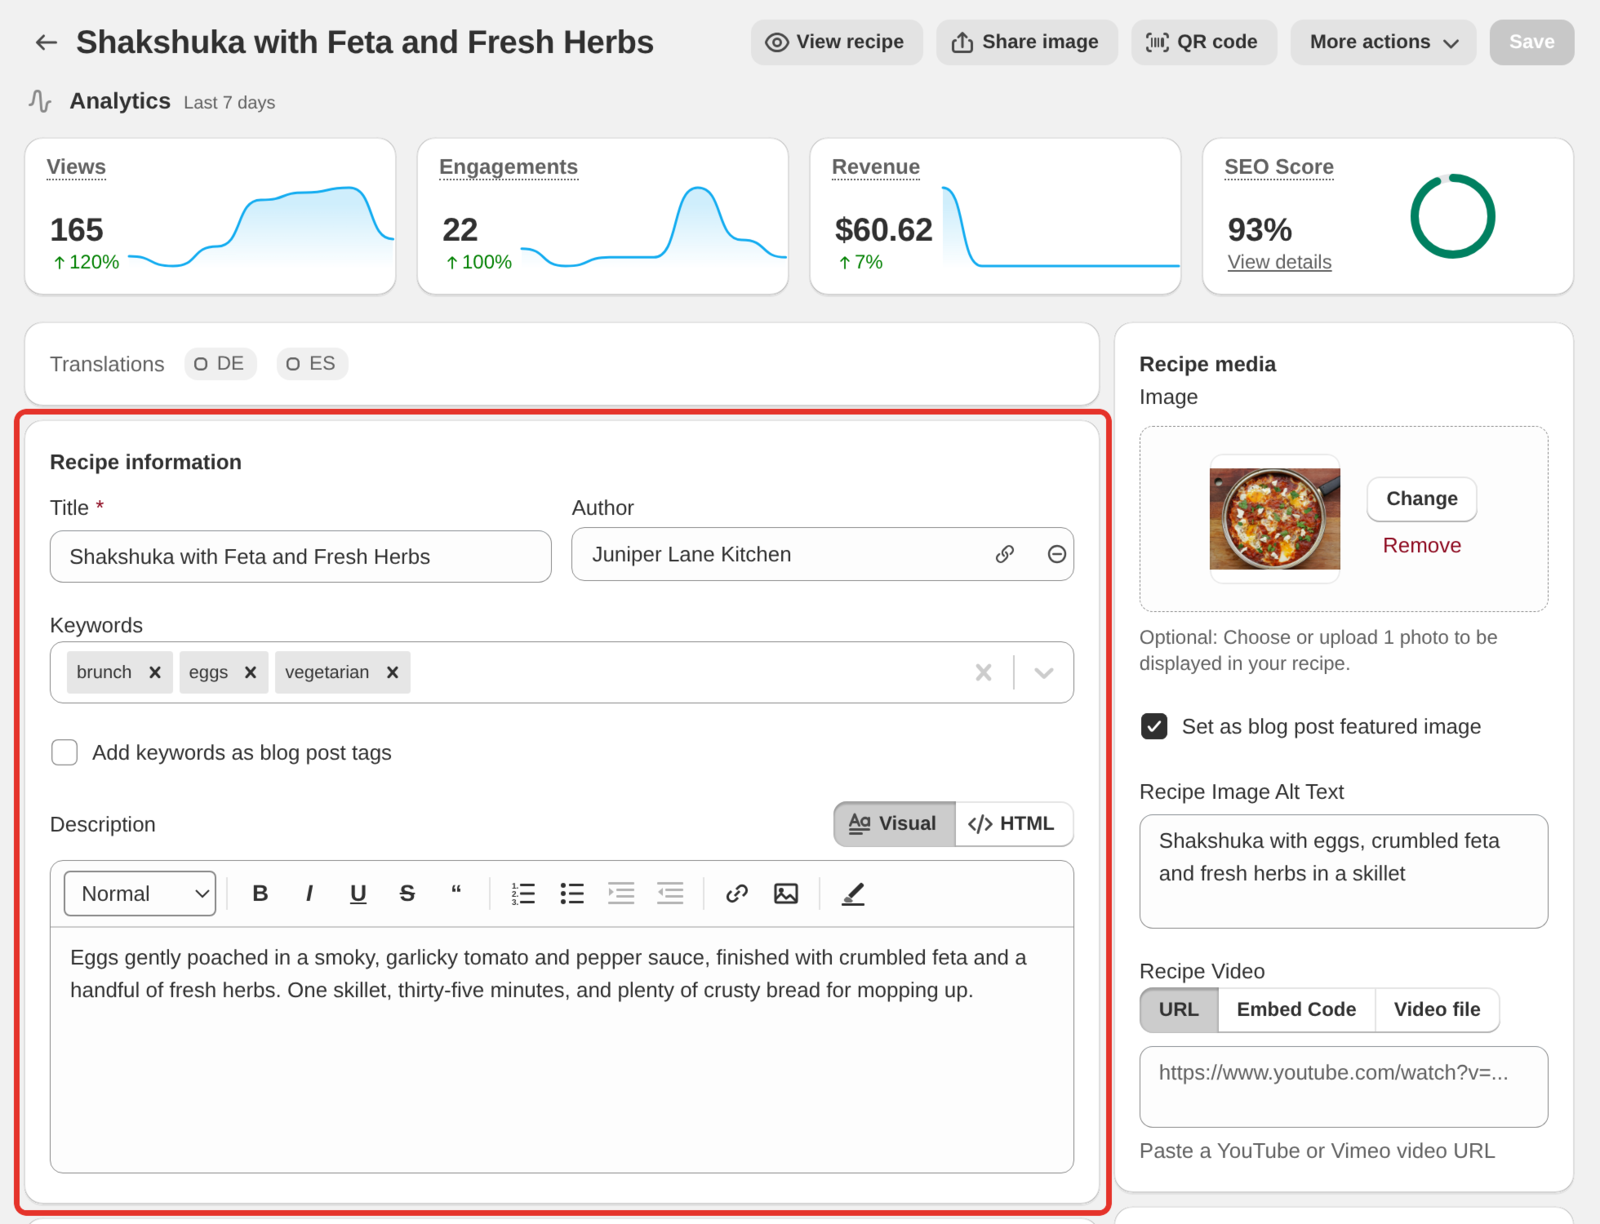
Recipe information
| Field | What it does |
|---|---|
| Title | The recipe card heading. Also used for search engines |
| Author | Shown on the card and in your recipe schema. Suggests names you have used before |
| Keywords | Search terms for the recipe. Tick Add keywords as blog post tags to copy them to the blog post as Shopify tags |
| Description | Two or three sentences on the card and in your schema. Switch between Visual and HTML to edit the formatting or the raw markup |
See Keywords, categories and blog post tags for how keywords and tags work.
Recipe details
| Field | What it does |
|---|---|
| Category | Dessert, Main Course and so on. Suggests values from your other recipes, and can hold a link |
| Cuisine | Italian, Thai and so on. Suggests values from your other recipes, and can hold a link |
| Servings | Free text, so "24 cookies" works as well as "4" |
| Prep time | Hours and minutes |
| Cook time | Hours and minutes |
| Custom fields | Click Custom fields to show two extra fields, Custom Field #1 and Custom Field #2. Each has a Name and a Value, such as "Difficulty" and "Easy", and shows on the card next to the times |
Total time is prep plus cook. You do not enter it.
Ingredients, directions and equipment
All three are lists you build a row at a time, and they work the same way:
- Click Add ingredient, Add direction or Add equipment to add a row, then type into it. Enter starts the next row.
- Paste a list with one item per line and each line becomes its own row.
- Drag rows to reorder them.
- Click Add group heading to split a long list into sections, such as "For the cake" and "For the frosting".
Each ingredient is one line of text. Write it the way you would in a cookbook, such as "2 cups all-purpose flour, sifted". There is no separate amount, unit and name to fill in.
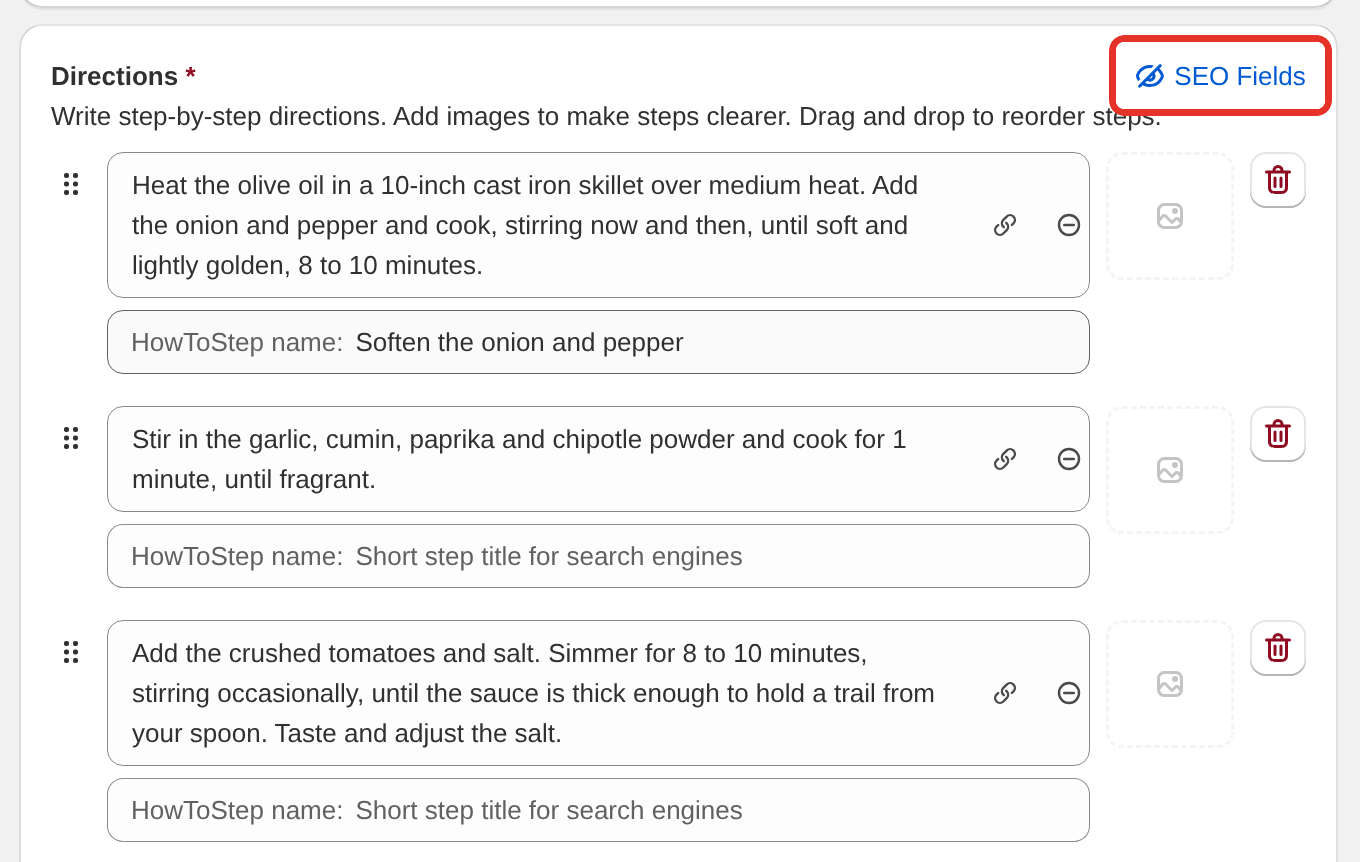
Directions have two extras. On the Growth plan each step can have a photo. And if you click SEO Fields at the top of the Directions card, each step gets a HowToStep name: box for a short step title that search engines read.
See Recipe ingredients, Recipe directions and Recipe equipment.
Nutrition, notes and FAQs
| Card | What it does |
|---|---|
| Nutrition | Values per serving. Type them in, or click Analyze to work them out from your ingredients. See Nutrition information |
| Notes | Storage, substitutions and make-ahead tips. Shows below the directions. Has the same Visual and HTML switch as the description |
| Frequently asked questions | Questions and answers shown under the recipe and published for search engines. Part of the Growth plan. See Recipe FAQs |
Recipe media
| Field | What it does |
|---|---|
| Image | The main recipe photo. Click Add from Shopify photos or Upload new photo, or drag a file onto the box. See Recipe images, sizes and alt text |
| Set as blog post featured image | Also uses the photo as the blog post's featured image |
| Recipe Image Alt Text | Describes the photo for screen readers and search engines. If you leave it empty, the recipe title is used |
| Recipe Video | A YouTube or Vimeo link, a TikTok or Instagram embed code, or a video file from your Shopify files. See Recipe videos |
| Video publish date | Shows once a recipe has a video. The date the video was first published, which Google reads |
Ratings
The Ratings card has one checkbox, Enable ratings for this recipe. It is on by default. Turn it off to hide the star rating on this recipe's card.
Link a category or cuisine
You can turn the Category or Cuisine text into a link, for example to a collection or a blog tag page. The link stays clickable on your recipe card and on the print page.
- In the Recipe details card, select the text you want to link in Category or Cuisine.
- Click the link icon at the right of the field (Add link).
- Enter the address in URL and click Save.
- Save the recipe.
If you select nothing, the whole field becomes the link. To change a link, click inside it and click the link icon again. The Edit Link window also has Remove Link.

Linking products and blog posts
Two connections worth making on every recipe:
- Products. Click Link product beside an ingredient or a piece of equipment to link it to something you sell. On every plan the line becomes a link to the product page. On the Growth plan it also gets an Add to Cart button. See Linking products to recipes.
- Blog post. This is what makes the card appear on your storefront. A new recipe gets its own post when you click Create, unless you pick a post you already wrote. Once the recipe is saved, the Connect to a blog post card names the post. Click Edit post in Shopify to change the post itself, or Change blog post to connect a different one. The picker also has Create new, which makes an empty post and connects it. See Linking blog posts to recipes.
Status
| Status | What it means |
|---|---|
| Published | Live on your store |
| Hidden | Saved, not shown. Use it for drafts and out-of-season recipes |
Set it under Set visibility in the editor. A new recipe starts with your Default Recipe Status (Settings > Advanced), Published by default, so choose Hidden before you click Create if the recipe is not ready. That keeps a half-finished recipe and its blog post off your store.
See Recipe status and visibility.
Check the SEO Score
The card at the top of the editor shows an SEO Score as a percentage. It measures how complete the recipe is: title, image, alt text, video, times, servings, nutrition, cuisine, ratings, FAQs and more. Click View details to see which parts are done and what to add next.
Preview and share the recipe
The buttons at the top of the editor:
- View recipe opens the recipe's blog post on your store.
- Share image makes a picture of the recipe for social media (Growth plan). See Share images for social media.
- QR code makes a code that opens the recipe on a phone (Growth plan). See QR codes for your recipes.
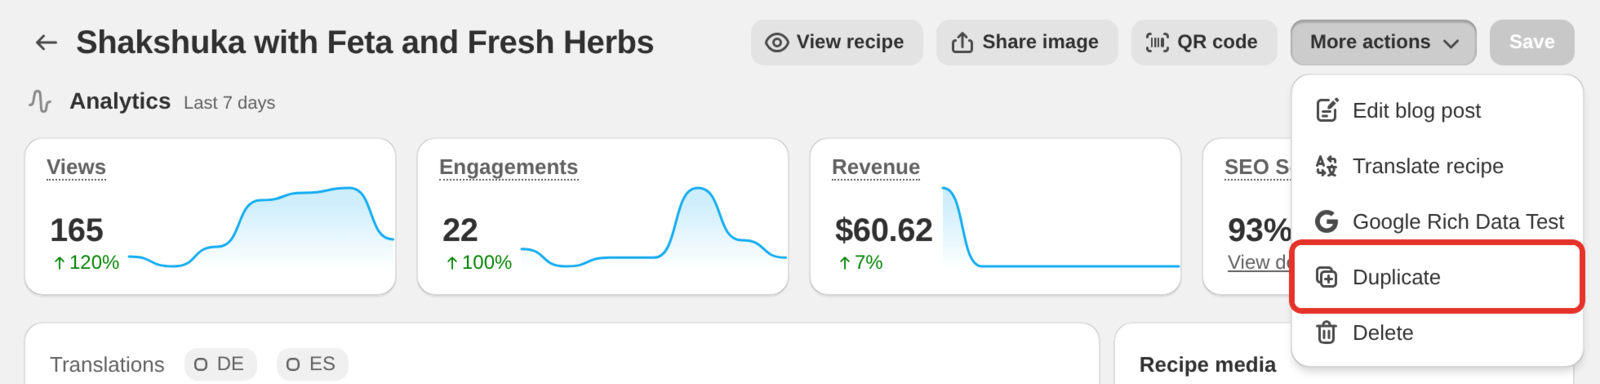
The More actions menu holds Edit blog post, Google Rich Data Test, Duplicate and Delete. If translations are on, it also has Translate recipe.
Duplicate a recipe
A copy is a quick start for a variation that shares most of its ingredients.
- Open the recipe in Recipe Kit.
- Click More actions and choose Duplicate.
- In the Duplicate recipe window, change the New recipe title. Recipe Kit suggests "Copy of" and the original title.
- Click Create duplicate.
Titles must be unique. If the title is taken, Recipe Kit says "A recipe with this title already exists. Try a different name."
Delete a recipe
- Open the recipe in Recipe Kit.
- Click More actions and choose Delete.
- Click Delete in the Delete recipe? window.
Deleting is permanent. The recipe card disappears from its blog post and product links are removed with the recipe. The blog post itself is not deleted.
Bulk actions
In the recipe list on the Recipe Kit home page, tick several recipes. Then click Publish, Unpublish or Delete to change them all at once.
Writing recipes people find
Titles. Be specific and use words people search for. "Creamy Garlic Tuscan Salmon" does far better than "Fish Recipe".
Descriptions. Two or three sentences on taste, texture and occasion. This is what shows under your title in search results.
Directions. One action per step, starting with a verb. Include temperatures, times and doneness cues. Steps written this way also read well in cook mode.
Fill everything in. Recipe Kit builds your Google recipe schema from these fields, so an empty field is a missing signal. Times, servings, nutrition and an image are the ones that show up in search results. The SEO Score tells you what is missing.
What's next
- Recipe ingredients covers fractions, group headings and the servings adjuster.
- Recipe directions covers step titles and writing steps that work.
- Recipe status and visibility covers what Published and Hidden do to your blog post.